Get prescriptive on how your team identifies, investigates, and mitigates threats. This guide breaks down 8 repeatable, field-tested techniques that cut through noise and accelerate threat discovery.
Manic Monday: A Day in the Life of Threat Hunting

Share:

“John, did you hear about the Acme CRM breach?”
John, a Cyber Threat Intelligence (CTI) analyst, turns to look at his CISO. He seems a bit rattled.
John responds, “Yeah. Huge story.”
“Massive. The board is worried and wants to know if this puts us at risk. We’re secure, right?”
John hesitates.“Let me get back to you on that.”
The CISO walks away. John races to his desk.
Step 1: Breach hunting
For a CTI analyst, hearing about a large breach often means the earliest warning signs have already passed, making fast validation critical.
Luckily for John, he has access to Bitsight Threat Intelligence’s Adversary Intelligence module, part of our larger Cyber Threat Intelligence solution, where he can investigate known campaigns and relevant IOCs to gain adversary context fast and better identify and prioritize threats.
John opens the module and searches “Acme CRM.”
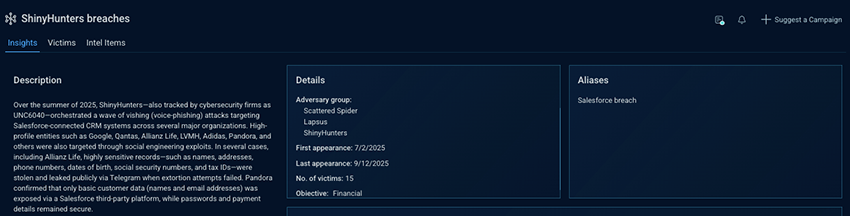
Instead of a single entry, he lands on a campaign tracked under a different name, ShinyHunters, with the Acme CRM breach listed as an alias. Oftentimes, a breach has alias names because the media refers to the same incident with different names depending on context and perspective. Connecting the alias names centralizes the data.
He starts analyzing the information.
The campaign description outlines how the breaches unfolded and the techniques the adversaries used to succeed, giving John early insight into where his defenses may need to be strengthened.
15 confirmed victims.
This isn’t an isolated breach. It’s a scalable campaign with operational momentum and likely additional, unconfirmed victims.
Adversary groups involved:
- Scattered Spider
- Lapsus
- ShinyHunters
Seeing multiple adversary groups tied to the same campaign signals that this isn’t a clean, single-actor intrusion but a multi-phase operation involving shared access, infrastructure, or handoffs between groups. This broadens the threat model: more entry points, more techniques, and more infrastructure to account for.
Step 2: Establish relevance
John scrolls down to view the timeline of the campaign, affected sectors, and locations.
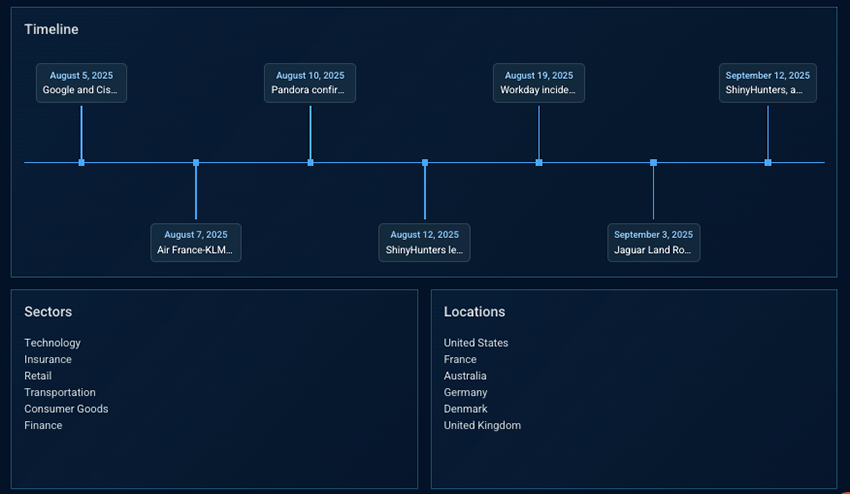
Timeline:
- Multiple distinct attack events in the span of a month.
This indicates sustained activity and not a single burst.
Campaign activity data:
- Sector: Finance
- Geography: France
John’s company operates in the financial sector and is headquartered in France.
While this doesn’t confirm targeting, the combination of sustained activity, sector overlap, and geographic alignment is enough to treat the campaign as operationally relevant.
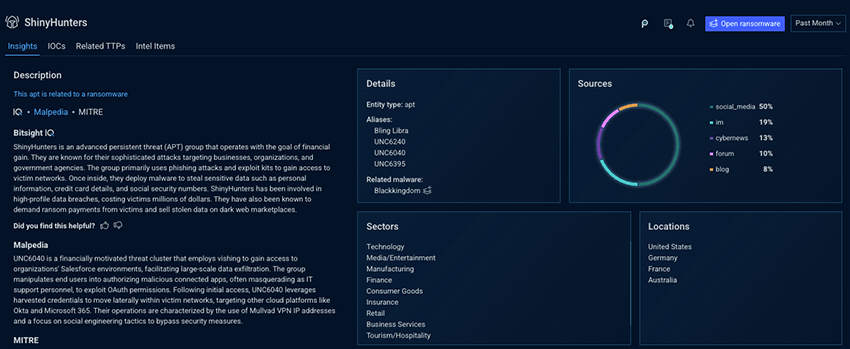
Step 3: Dive into the adversary profile
With multiple APTs involved in this campaign, it's crucial to understand which actor’s historical targeting matches your environment. The actors that match give analysts a better indication of TTPs to keep an eye on.
John pivots to learn more about ShinyHunters. He learns about their aliases, the sectors and locations they operate in. He sees that they also operate in the financial sector and in France. This identifies ShinyHunters as a highly operationally relevant threat actor for him to focus on.
Step 4: Turning threat actor insight into defensive action
John opens up the ShinyHunters IOCs tab and checks the listed domains, IPs, and hashes against his company’s existing detections. While some are already covered, a few aren’t. By identifying which ShinyHunters indicators are not yet covered by existing controls, John exposes concrete detection gaps tied to this adversary, allowing him to hunt for prior activity, strengthen monitoring, and prioritize defensive actions where they matter most.
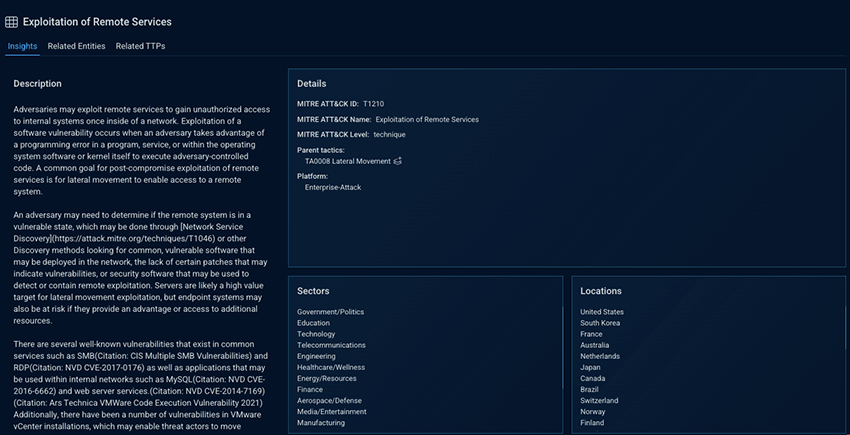
Next, John opens the Related TTPs tab and sees all the attack techniques that Shinyhunters has relied on across campaigns. Because these techniques are mapped to the MITRE ATT&CK framework, John can assess detection and mitigation coverage at the behavior level, independent of specific tools or infrastructure.
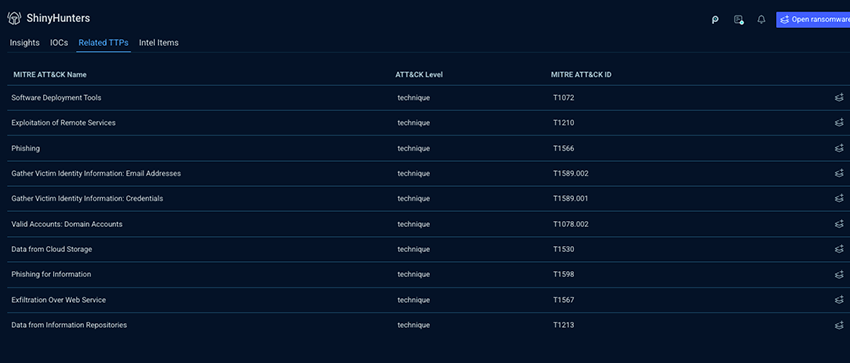
Drilling into the details, he sees that one TTP is repeatedly used in the financial sector and in France. That alignment elevates it to a high-priority hunting signal, highlighting a behavior that has proven effective in environments that closely mirror his own.
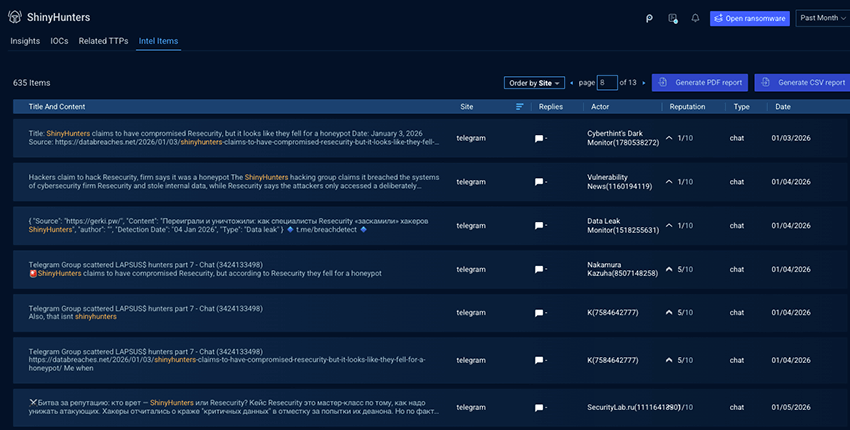
Diving into Intel Items, John learns that ShinyHunters operates a Telegram channel and is active on underground forums. Using Adversary Intelligence, he can investigate both historical and real-time raw intelligence tied to the group, allowing him to track shifts in activity, validate attribution, and spot early signals before they translate into attacks.
Step 5: Turning uncertainty into preparedness
John can see the signs. Even an initial review provides enough indication that this campaign warrants heightened readiness. With Adversary Intelligence, he’s now one step ahead, replacing uncertainty with information that drives smarter, more informed, decision-making.
After completing his investigation across the associated APTs and taking the appropriate actions, John uses the IQ Report Generator to create a clear, shareable report for all stakeholders explaining the extent of the campaign and its relevance to the business.
Now, he can turn to his CISO and confidently explain where coverage exists, where gaps were identified, and what was done to address them.
Talk to our team about how you can get started threat hunting today.
8 Techniques to Elevate Your Threat Hunting Program